Traefik 인그레스 컨트롤러

인그레스란?
외부의 HTTP 요청에 대한 서비스 처리 규칙을 정의한 리소스”
인그레스의 주요 기능
- 라우팅 - URL 및 경로별 백엔드 서비스 분리
- SSL/TLS 인증서 연동
- 인그레스와 인그레스 컨트롤러 - 애플리케이션 관리 효율을 위해 외부 접속에 관한 상세 규칙을 별도 인그레스 리소스로 분리
Traefik
Traefik ingress controller vs nginx ingress controller
nginx ingress controller가 주로 많이 사용되지만, traefik은 nginx ingress controller가 제공해주지 않는 관리자 페이지를 제공하고, CRD를 이용해 옵션 설정이 쉬운 장점이 있다.
Traefik ingress controller 설치 by helm
1
2
3
4
5
6
7
8
helm repo add traefik https://helm.traefik.io/traefik
helm pull traefik/traefik
tar zxvf traefik-26.1.0.tgz
cd traefik
cp values.yaml my-values.yaml

#my-values.yaml 수정
helm install traefik -f my-values.yaml . -n traefik
patch
ingress controller의 replicas를 늘리고, dashboard에 접근할 수 있게 expose를 추가하고, controller pod가 같은 노드에 배치되지 않도록 antiAffinity를 추가
1
2
3
4
5
6
7
8
9
10
11
12
13
14
15
16
17
18
19
20
21
22
23
24
25
26
27
28
29
30
31
32
33
34
35
36
37
38
39
40
41
42
43
44
45
46
47
diff --git a/traefik-26.1.0/my-values.yaml b/traefik-26.1.0/my-values.yaml
index dbd078f..6b737ec 100644
--- a/traefik-26.1.0/my-values.yaml
+++ b/traefik-26.1.0/my-values.yaml
@@ -21,7 +21,7 @@ deployment:
   # -- Deployment or DaemonSet
   kind: Deployment
   # -- Number of pods of the deployment (only applies when kind == Deployment)
-  replicas: 1
+  replicas: 2
   # -- Number of old history to retain to allow rollback (If not set, default Kubernetes value is set to 10)
   # revisionHistoryLimit: 1
   # -- Amount of time (in seconds) before Kubernetes will send the SIGKILL signal if Traefik does not shut down
@@ -626,7 +626,7 @@ ports:
     # -- You SHOULD NOT expose the traefik port on production deployments.
     # If you want to access it from outside your cluster,
     # use `kubectl port-forward` or create a secure ingress
-    expose: false
+    expose: true
     # -- The exposed port for this service
     exposedPort: 9000
     # -- The port protocol (TCP/UDP)
@@ -927,11 +927,21 @@ resources: {}
 #   cpu: "300m"
 #   memory: "150Mi"

+affinity:
+# # This example pod anti-affinity forces the scheduler to put traefik pods
+# # on nodes where no other traefik pods are scheduled.
+# # It should be used when hostNetwork: true to prevent port conflicts
+  podAntiAffinity:
+    requiredDuringSchedulingIgnoredDuringExecution:
+      - labelSelector:
+          matchLabels:
+            app.kubernetes.io/name: '{{ template "traefik.name" . }}'
+            app.kubernetes.io/instance: '{{ .Release.Name }}-{{ .Release.Namespace }}'
+        topologyKey: kubernetes.io/hostname
+
 # -- This example pod anti-affinity forces the scheduler to put traefik pods
 # -- on nodes where no other traefik pods are scheduled.
 # It should be used when hostNetwork: true to prevent port conflicts
-affinity: {}
-#  podAntiAffinity:
 #    requiredDuringSchedulingIgnoredDuringExecution:
 #      - labelSelector:
 #          matchLabels:
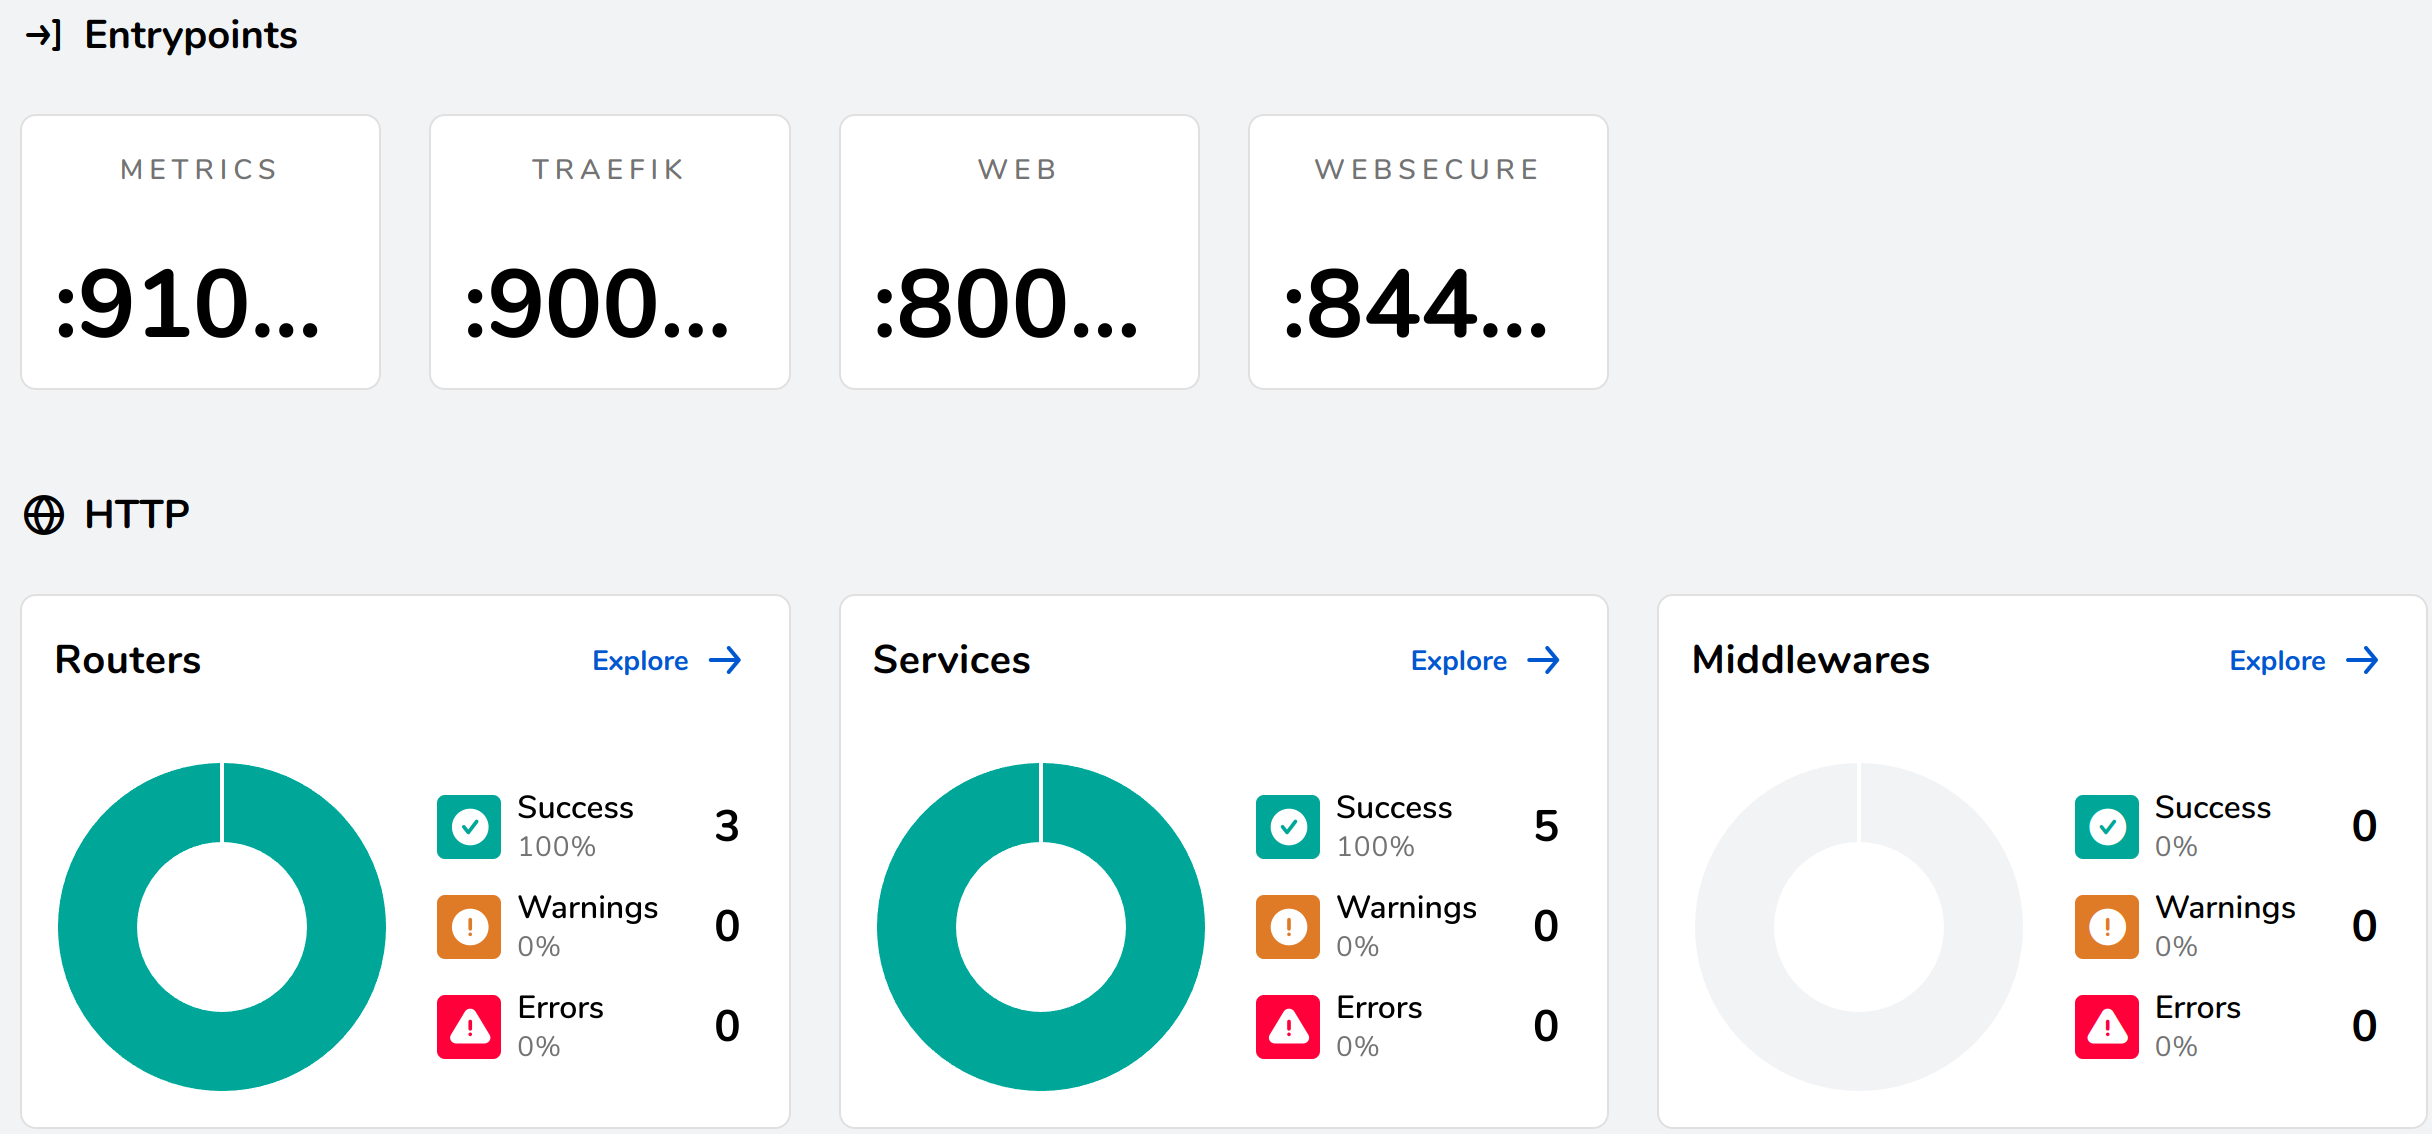
생성 후 아래과 같은 dashboard에 들어갈 수 있는 LoadBalancer가 자동으로 생성된다.

External-IP에 해당하는 주소를 바탕으로 dashboard에 접근이 가능하다. (/dashboard/#/)을 추가해줘야 한다.
인그레스 테스트를 위한 애플리케이션
https://github.com/wikibook/kubepractice/tree/main/ch09
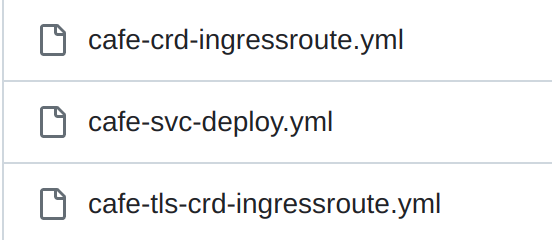
cafe-svc-deploy: 4개 app을 배포

IngressRoute를 생성해 route와 tls를 설정할 수 있다.
Example
host에 다음을 지정 (ip는 traefik ingress controller를 지정)
1
2
3
192.168.56.152 coffee.myweb.com
192.168.56.152 tea.myweb.com
192.168.56.152 www.myweb.com
secret key에 tls private key와 인증서 등록 후 IngressRoute의 spec.tls.secretName에 사용
1
k create secret tls myweb-tls --key myweb01.key --cert www.myweb.com.crt -n cafe

1
2
3
4
5
6
7
8
9
10
11
12
13
14
15
16
17
18
19
20
21
22
23
24
25
26
27
28
29
30
31
32
33
34
35
36
37
38
39
40
41
42
43
44
45
46
47
48
49
50
51
52
53
54
55
56
57
58
59
60
61
62
63
64
65
66
67
68
69
70
71
72
73
74
75
76
77
78
79
80
81
82
83
84
85
86
87
88
89
90
91
92
93
94
95
96
97
98
99
apiVersion: traefik.containo.us/v1alpha1
kind: IngressRoute
metadata:
  name: coffee-ingressroute
  namespace: default
spec:
  entryPoints:
  - web
  routes:
  - match: Host(`coffee.myweb.com`) # curl coffee.myweb.com
    kind: Rule
    services:
    - name: coffee-svc
      port: 80
---
apiVersion: traefik.containo.us/v1alpha1
kind: IngressRoute
metadata:
  name: tea-ingressroutetls
  namespace: default
spec:
  entryPoints:
  - websecure
  routes:
  - match: Host(`tea.myweb.com`) # curl https://tea.myweb.com -k
    kind: Rule
    services:
    - name: tea-svc
      port: 80
  tls:
    certResolver: myresolver
---
apiVersion: traefik.containo.us/v1alpha1
kind: IngressRoute
metadata:
  name: juice-ingressroutetls
  namespace: default
spec:
  entryPoints:
    - websecure
  routes:
  - match: Host(`www.myweb.com`) && PathPrefix(`/juice`) # curl https://www.myweb.com/juice -k
    kind: Rule
    services:
    - name: juice-svc
      port: 80
  tls:
    certResolver: myresolver
---
apiVersion: traefik.containo.us/v1alpha1
kind: IngressRoute
metadata:
  name: water-ingressroutetls
  namespace: default
spec:
  entryPoints:
    - websecure
  routes:
  - match: Host(`www.myweb.com`) && PathPrefix(`/water`) # curl https://www.myweb.com/water -k
    kind: Rule
    services:
    - name: water-svc
      port: 80
  tls:
    certResolver: myresolver
---
apiVersion: traefik.containo.us/v1alpha1
kind: IngressRoute
metadata:
  name: juice-ingressroutetls
  namespace: default
spec:
  entryPoints:
    - websecure
  routes:
  - match: Host(`www.myweb.com`) && PathPrefix(`/juice`) # curl https://www.myweb.com/juice -k
    kind: Rule
    services:
    - name: juice-svc
      port: 80
  tls:
    secretName: myweb-tls
---
apiVersion: traefik.containo.us/v1alpha1
kind: IngressRoute
metadata:
  name: water-ingressroutetls
  namespace: default
spec:
  entryPoints:
    - websecure
  routes:
  - match: Host(`www.myweb.com`) && PathPrefix(`/water`) # curl https://www.myweb.com/water -k
    kind: Rule
    services:
    - name: water-svc
      port: 80
  tls:
    secretName: myweb-tls
https://doc.traefik.io/traefik/routing/entrypoints/

인증서 만들기
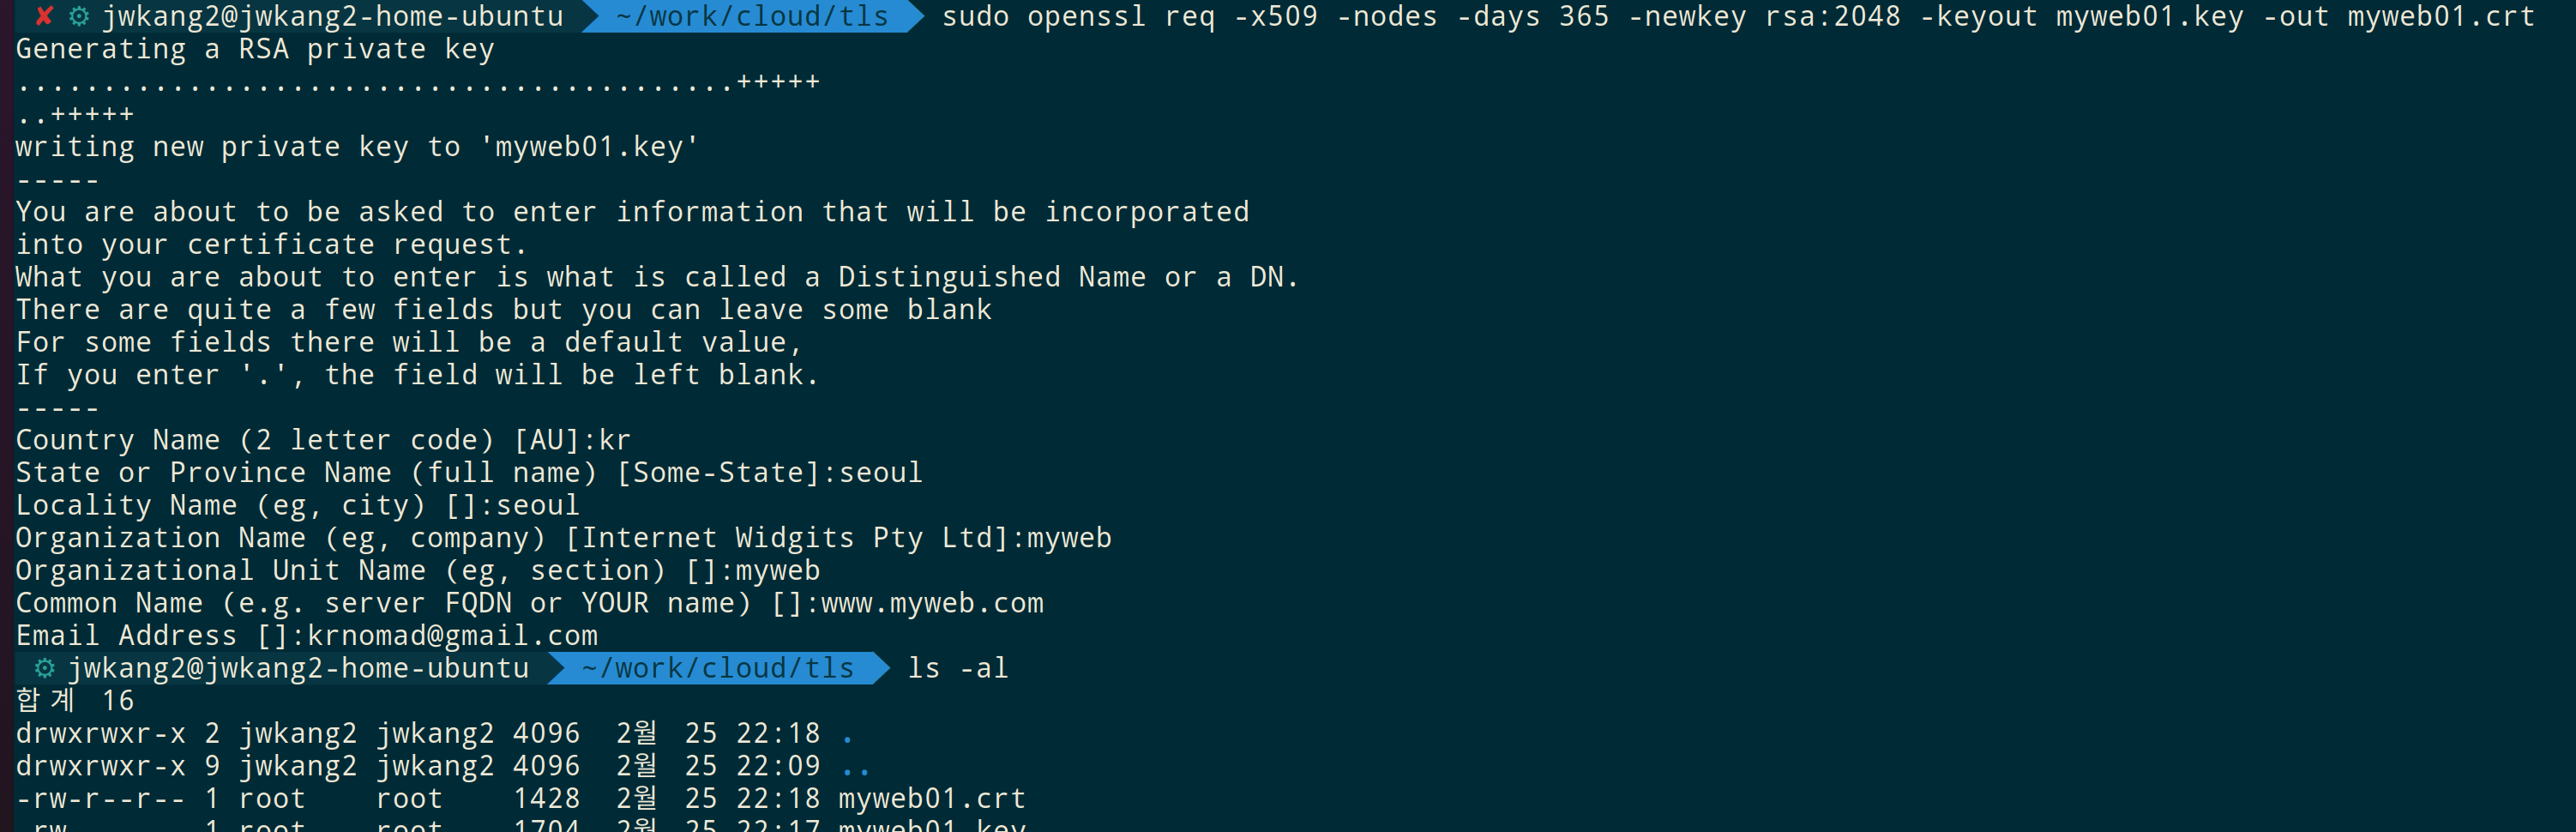
private.key와 self-signed certificate 생성
1
sudo openssl req -x509 -nodes -days 365 -newkey rsa:2048 -keyout myweb01.key -out myweb01.crt
private.key와 csr 생성
1
sudo openssl req -new -newkey rsa:2048 -nodes -keyout myweb01.key -out myweb01.csr
서버 crt 파일 생성
myweb01.key를 Certificated Authority(CA-인증기관)의 private로 보면, 인증 요청(CSR - Certificate Signing Request)에 대해 인증해 crt 파일로 생성한다.
1
sudo openssl x509 -req -days 365 -signkey myweb01.key -in myweb01.csr -out www.myweb.com.crt
서버는 TLS handshake 시 crt파일을 client로 전달하게 되고, clitent는 CA기관의 public key을 바탕으로 인증한다.
1
openssl verify -CAfile ${CA기관의 인증서) ${server가 전달한 인증서)
- Root CA Certificate의 공개키 확인: 클라이언트는 운영체제나 브라우저와 같은 신뢰할 수 있는 소스에서 Root CA (Trust Anchor)의 공개키를 가지고 있다. 이 공개키는 일반적으로 CA의 공개 인증서로 제공된다.
- 인증서 체인 검증: 클라이언트는 서버로부터 받은 인증서가 서명되었는지 확인한다. 인증서는 CA의 개인키로 서명되어 있으며, 클라이언트는 CA의 공개키를 사용하여 이 서명을 확인한다. 이 과정을 통해 인증서가 변조되지 않았고, CA에 의해 발급되었음을 확인할 수 있다.
- 신뢰할 수 있는 CA인지 확인: 클라이언트는 인증서의 발급자가 자체적으로 신뢰할 수 있는지 확인한다. 이를 위해 클라이언트는 CA의 공개키를 사용하여 인증서의 서명을 확인하고, 해당 CA의 인증서를 신뢰할 수 있는지 여부를 결정한다.
- 인증서 체인의 검증: 인증서가 중간 CA에 의해 서명되었을 경우, 클라이언트는 중간 CA의 공개키를 사용하여 해당 인증서의 서명을 확인한다.